
How To Embroider On Tulle
It has only been a few weeks since Charles began to experiment with how to embroider on tulle. If you’ve never embroidered on tulle before it can be tricky to know how to start. This is especially due to the transparent and fragile nature of the tulle fabric.
However, as soon as you learn these top 5 best tips, you’ll be embroidering on tulle before you know it. Modern embroidery designs on tulle has become very popular. In fact, ones you understand the properties of the tulle and how to use it to your advantage, you can embroider almost any kind of design (including our architectural patterns!)
The most important is just to recognise the transparency that everything you do on the back of the fabric, will be seen on the front too… But more on that in tip 3 and 4!
Why use tulle for embroidery?
Before going into the steps, you might wonder why even try if tulle is more difficult? Because it is incredibly fun and you can use your tulle embroideries for a bunch of stuff (such as turning into patches for your clothes)! The transparency of the tulle can really add something unique and fascinating to your artwork.
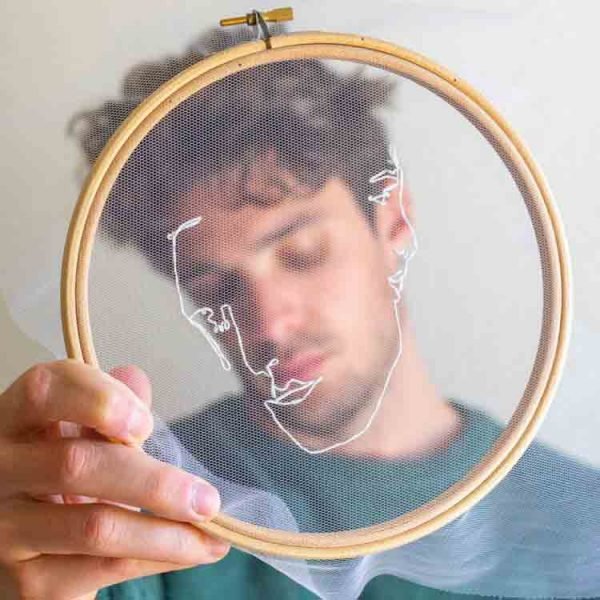
For example, Charles has experimented to place himself behind the work as a juxtaposition in relation to the actual embroidery. Sometimes the embroidery is a general design of a flower or plant, whereas other times he used his own face as the baseline. There are no limits to your imagination!

Charles and Elin Academy
Click on the image to learn more about our course on Creating Your Own Embroidery Design.
5 Key Things To Think About When You Want To Embroider On Tulle
1) How hard you pull the threads
2) How hard you stretch the tulle in the hoop
3) The placement of your threads
4) How you attach the threads when finished
5) Inspiration for tulle stitching
With this list right at the beginning, it might feel overwhelming to even consider to try to embroider on tulle.
But I aim to digest each aforementioned point in more detail as well as show you some recent examples by Charles. Even though written articles can be very helpful, I find that for creative arts and crafts projects the visual support is just as important.
Thus if you prefer video explanations, don’t hesitate to have a look at a livestream that Charles did about embroidery on tulle for beginners. To learn more from us via video tutorials, we also invite you to have a look at our Charles and Elin Academy.
How To Embroider On Tulle?
1. How hard to pull the threads
First you must be aware of the fragility of the tulle fabric. This is why the first point above targets how hard to pull the thread. In fact, the necessity to be VERY LOSE on your hand is one of the first things you will notice when you begin to stitch.
As soon as you pull a little bit harder, you risk to make a hole in the fabric.
This has happened to Charles on several occasions. However, he noticed it in time before the hole got too big and thus was able to mend the hole carefully. Of course this is only possible if you embroider a design with relatively covered surfaces.
With designs that concentrate on delicate contours, it will be trickier to mend a hole without it showing too much.
Hence, in short: Be gentle and rather pull to few than too much (especially in the beginning).
2. Stretch the fabric
Continuing on the effects of the fragility of tulle, it will also have an impact on how you stretch it in a hoop. To be able to make smooth stitches you need to stretch the fabric in one way or another and a hoop is always handy. Because if you don’t stretch the tulle, it can easy create bubbles and just be very difficult to get an overview of the design/where to place your stitches.
Just as you need to be gentle on your hand when you embroider on tulle, you also need to be gentle when you stretch it… Logic right! Thus the way we recommend is that you place the fabric on the inner part of the hoop. Try to place it “flat”. In other words, as naturally stretched out as possible.
Thereafter you place the outer ring on top of the inner and tie up the hoop. If you did the aforementioned trick, you will most likely not have to pull the tulle while it’s in the hoop for additional tension. Instead, just the fact of closing the hoop with the outer ring is enough to make the tulle straight and neat.

3. Placement of your threads
Now you have your tulle in the hoop and some basic understanding to be gentle in your stitching. But how to stitch so that you don’t see the threads through the fabric?
Well, it’s technically impossible to not see the underside through. This is due to the transparent nature of the tulle. As a result, the best way to work around it is to use it to your advantage. Either you only do travelling lines underneath areas where you have or will fill out. For example this was seen in the freestyle embroider on tulle video by Charles above.
Another example is to use the running stitch instead of the typical backstitch for contours. In his Instagram post below you can see how Charles almost “weaves” his stitches through the fabric, which makes the stitch under as important as the ones above.
Here is another example with a full process video on Youtube, where you can also see the weave technique for the contours. The eyebrows on the other hand are stitched with more “loop” looking stitches.
4. Attach the thread
How you want to attach the thread will be related to the type of design you are embroidering. If you embroider a fine contour design, you will want to minimise the thread on the back as much as possible. In that case it’s recommended to secure the thread with a tight knot underneath one of the lines. Thereafter cut the rest of the thread as close to the knot as you can but without the risk of the knot undoing itself.
The second option is to secure your thread with stitches on the back. However, this only works if you chose to embroider a more thread-painted type of design. In that case it might even be beneficial to attach the thread with stitches as it will add some extra stability on the back.
5. Tip on how to get inspiration for your next tulle embroidery
Lastly, before rounding off today’s article, I just want to leave you with some thoughts on how to create your own embroidery designs on tulle.
If you have watched Charles embroider on tulle in the videos above, you have probably seen that he first draws his designs on paper. Thereafter makes a photocopy and then transfer the design onto the tulle with an ink pen.
However, what if you don’t know what to make? Lack of inspiration?
Here is a list of some proactive ways that you can kickstart your inspiration for designs:
Take a walk (and bring your camera if you want to capture something that could become a pattern…!)
Look through magazines of topics that interest you (e.g. gardening, interior design, crafting, art…)
Check on Instagram (just don’t get lost spacing!)
Check on Pinterest
In our Masterclass on create your own embroidery design we have included a full tutorial that discusses inspiration in more depth and how you can boost it.
Before letting you go, I’d like to share one last example to boost your ideas. Here Charles shares how he found his inspiration by looking at his own photos on Instagram.
To look through your own pictures can be a useful trick to ensure the authenticity of your design. Because none else is you. As a result, your pictures of yourself will always stay authentic to you and your own style.
Hope you enjoyed this article! Thanks for reading and hope to see you back soon again 🙂
For more in depth learning about modern embroidery have a look at our online courses.
Or perhaps, your fingers are itching for a new exciting project – then don’t miss our unique architectural embroidery patterns!